Showing posts with label Home Tour. Show all posts
Monday, March 6, 2017

Office Preview

We purchased most of our furniture when we built our last house in 2006, so it's time to update things a little. It all started with Michael buying two monitors, a keyboard, and a laptop docking station for his office. Once everything arrived I realized that our desk was way too small and I needed to find something new. Several of the decor items in our office are black and gold, so I decided to stick with that color scheme. The first two purchases I made were this console table and rug. 


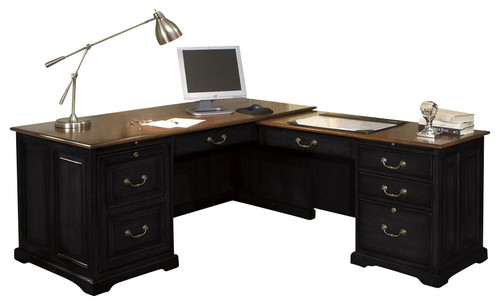
I'd originally planned on getting a more modern glass desk, and found what I thought would be the perfect one, but then Michael set up the monitors and docking station and I realized that I needed something that would hide some of the cords and the actual docking station. I started searching and found this L-shaped desk at Adam's Furniture. It still fit with the overall color scheme of the room, so I decided to switch directions a little. We ordered this desk and the matching lateral file.   

Bridgeport L-Shaped Computer Workstation
Riverside Furniture Bridgeport  Lateral File in Antique Black

Right now the only things that have been delivered are the table and the rug, but I'm so excited with how the room is coming together! Stay tuned for the full room reveal soon!

XOXO,
Friday, February 19, 2016

Our Home {Entry}

Welcome to our home!


In hindsight it probably would have made more sense to do this as my first post since it's the entrance into our house, but I didn't and I can't go back now, so I'll share it as the second home tour post.

When we decided to build this house, one of the things I loved about it was the entry. The door opens up to a beautiful "twisty" staircase (Carter's description) and you can see straight to the back of the house. Here is a shot of the entry in progress.


I can't resist posting a picture of these two cuties in the little alcove by the stairs. I can't believe how young they look!


Once we moved in I realized that while there are two windows above the front door and you can see straight to the back of the house, it was still pretty dark in there. It doesn't help that our door is solid wood. I absolutely love it, and kind of prefer that when people ring the doorbell they can't see in to know if I'm there or not (I don't know about you, but if Michael isn't home and I'm not expecting anyone, oftentimes I don't answer the door), but I'm kind of wishing that we'd chosen door with glass so it would let a little more light in. Eventually we may change it out, though we had to fight the builders for the rounded door so we'll see.

Back to entry decor....I had this bench from Home Goods sitting in the entry with a chalkboard hanging above it, and for the longest time the alcove by the stairs sat empty.


The above picture is actually from our old house, and seeing it reminds me I still have that family frame in a closet somewhere! 

Anyhow, the entry was already dark, so having a black bench with a black chalkboard above it didn't do much for the space. Enter white chalk paint and a new rug!


Looking at this photo now I realize that I never actually painted the inside of the bench under the baskets and you can totally see it. Oops! Guess I have a project to tackle next week! 

Once I had that part of the entry finished I decided it was time to tackle the alcove by the stairs. I enlisted my mom's help and we headed to the upscale furniture resale shops in the area. We saw a round table at the first store we went to, but it was listed at $199 and I wasn't sure I wanted to spend that much money on a table that would just sit in a corner. I don't know, maybe it was a good price, I just haven't bought enough furniture recently to have a good idea of the cost. We decided to keep looking, so we went to a few other resale shops, Home Goods, and Pier 1, but didn't find anything. This was late October and I planned on putting my Christmas tree in the alcove, so there wasn't a big rush. The table at the first store we went to was set to drop in price to $159 on December 8th, so I decided to hold off on making any purchases and hope the table was still there in December. If it was I knew it was meant to be, and if it wasn't I would just be incredibly disappointed (my first clue that it was the perfect table).

The day after Thanksgiving we decorated for Christmas. I realized quickly that I didn't actually want to put our Christmas tree in the alcove - the only time we'd see it was when we were in the front of the house. I wanted to be able to sit by the tree and enjoy the twinkling lights. :) Because the tree didn't go there I was very anxious to get that table! I am not a patient person when it comes to making purchases (if I decide I want something I need it now), but somehow I was able to wait until December 8th to go to the store. When I arrived there were two ladies there who were buying a couch that was next to the table and we also apparently considering the table (this from the lady at the checkout). After purchasing the table I went to Home Goods and Hobby Lobby and picked up a few things to put on the table. When I got home I immediately set it up and sent my mom this picture.


It fit pretty well, but still seemed to be missing something. We hung a mirror that I'd gotten at Hobby Lobby, but it still didn't look quite right, so I moved the chair out of our bedroom into the space. Perfect!


The finishing touch was this Joshua 24:15 sign from Petunia Fitzgerald Collections. 


I still want a little more light in the entry (the last pictures were taken with our front door open), so I'll eventually get a new chandelier for the foyer, but for now I'm happy. It's warm and welcoming, which is exactly the look I was going for!

I'll be back soon with another room reveal!

XOXO,
Monday, February 15, 2016

Our Home {Kitchen)

My plan was to do a home tour, but I've been changing things up a little, so I want to finish that before I do the full tour. For now I'll start with the kitchen! Here are a few in progress shots because those are always fun!


It makes sense to start here since it's one of my favorite rooms in the house! When we built this house we got to design our dream kitchen! It's not that I didn't love the kitchens we designed in our last two houses, but we were a little more limited in the choices that our builders offered, so I couldn't get everything I wanted. In this house we got it all: double oven, pot filler (not as awesome as I thought it would be, by the way ~ it's only cold water so the water takes FOREVER to boil!), beautiful granite, white cabinets with a coffee glaze, no farmhouse sink, but it will come eventually and I love it as is!

When you pick the standard granite, which we did for our bathrooms, you don't get to pick the slab, but we got to pick out the slabs for our kitchen because we upgraded a little (easy to do when the builder is offering 50% off upgrades). Here is the slab we chose for the island - the tape represents where they were going to cut and where we wanted the sink placed. The granite is called Alaska. I'm so glad we got to choose, because the newer Alaska slabs don't look anything like this. We had to  visit two or three warehouses to find slabs that resembled what we'd chosen in the design gallery.


Here is a picture of the kitchen right before we moved in.


I'm going to back up a little to explain why our kitchen counters stayed bare for the first 11 months we lived here. When we decided to sell our last house, my mom suggested I remove everything from the counters (toaster oven, coffee pot, etc) for a cleaner look. I even went so far as to throw out our toaster oven (in my defense, it was old and didn't work that well, so it's not like I threw away a perfectly good appliance)! Now when we want to make toast or Eggo waffles we just turn the oven to broil and throw the food in right away for one minute per side. It works great and there is no mess on our counters ~ try it, you'll never go back! I got used to the look, and was in love with my new counters and backsplash, so when we moved in I kept the minimalist look.

My desire to decorate actually started when we moved our entertainment center (actually a sideboard with a wine rack built in) out of the family room and into the kitchen nook. I added an EAT sign that I'd painted along with a decorative platter, but it looked pretty barren. That's about the time I discovered the #WWYDdecor hashtag on Instagram. I posted this picture and asked for advice.


Someone suggested I move the stuff down from the walls and layer it on the sideboard, but then I'd be left with empty walls with holes that I needed to fill and paint so that wasn't an option. Another hashtag I had seen on Instagram a lot was #TuesdayDecorParade which was all about tiered trays, so when someone suggested I get a tiered tray I knew it was meant to be! I picked up a wood and metal tray from World Market along with a cute little lavender nest and a succulent and brought them home. I had a collection of tea cups and saucers in my cabinet, so I added one along with the blue and white elephant we purchased in Amsterdam last year and it was finished! I also picked up a cute sign and framed chicken wire (I can't think of any other way to describe it, that's what it is) from Hobby Lobby and a decorative sphere and topiary at Home Goods. I love how it turned out! Now I just need the Magnolia Farms tray I ordered on sale from Magnolia Market to arrive (and for it to fit!) for the bottom shelf.


After I finished the nook I decided I needed to work on the rest of the kitchen. We do a lot of entertaining, but I've recently realized that I am severely lacking in serving pieces. Because of this I ordered a Lazy Susan from The Signature Swag. When it arrived I knew that it would be perfect on display, and when we are entertaining I have easy access to it! I used a metal basket and ampersand from Hobby Lobby, a topiary from Home Goods, and the family cookbook Michael's aunt and uncle gave us for our wedding to complete the vignette.


I just changed out our wooden kitchen utensil holder to a silver wine bucket I found while unpacking at my parent's new house this past weekend. They had four of them, so I decided they wouldn't miss one. :) I kind of love the look!


I already had the milk jug measuring cups from Anthropologie (mine is a little shorter because the 1/3 cup broke in our move) and our knife block on the other side of the counter, but I decided to add a mason jar cookie jar and vintage breadbox as well. When adding items to your kitchen counters, try to get things that can serve a double purpose - the bread box and cookie jar look adorable sitting on the counter, but they're also holding two loaves of bread and the chocolate chip cookies I baked with my niece yesterday.


Isn't the farmer's market pillow adorable? I ordered it from Peek Pillow Originals.


The island is still pretty empty other than our paper towel holder and soap dispenser. I had gotten a cake stand at Home Goods several months back, and it was just sitting in the cabinet, so I decided to put our soap on "display" to pretty it up a little.


I made the Bakery sign and added the Fresh Baked Pies sign from World Market to the counter in our Butler's Pantry where I keep my canisters and Kitchenaid mixer. Again, use items that can serve a double purpose (I'm obviously not talking about the signs here) ~ the canisters hold flour, sugar, and candy (yes, you read that right), and the ceramic egg crate is perfect when I get fresh eggs from my friend!


The bar counter in the Butler's Pantry was begging for something. At first I was going to do a coffee bar, but since I don't drink coffee unless it tastes like chocolate (Starbucks White Mocha - yum!) I decided that didn't make much sense. I love to make sparkling lemonade (use one can of frozen pink lemonade and sparkling water), so I searched Pinterest for a cute printable and created a mini lemonade stand. 


Here is a view of the kitchen from the Butler's Pantry. We used to have a runner that matched the rug in the nook, but it started to get dirty so I replaced it with a bio-foam rug from Bed Bath & Beyond. So much comfier to stand on when I'm washing dishes!


Here are a couple shots of the kitchen from the family room. You may have noticed that I rearranged a few things after I took these pictures (I think I'll forever be doing that). :)


I hope you enjoyed my kitchen tour! I tried to link either identical or similar items if you're looking to add anything to your kitchen!

I'll be back soon to share another room! 

XOXO,
Wednesday, January 6, 2016

Our Home {Guest Room}

Happy New Year! Sorry I've been absent for the past few weeks. With Sophia, Carter, and Michael all home for the two week holiday break, I was pretty busy! We had a fantastic Christmas that flew by way too fast.

I can't believe that we have already lived in our new house almost a year! It seems that since moving in last February the guest room has become the catch-all for anything that doesn't have a place. I decided that I needed to tackle the mess and make it an actual place where guests can sleep! Here are a few shots of the before.

**On an unrelated note - I obviously need to buy a camera because my iPhone just isn't cutting it. What camera do you have?**


We already have a nice bedroom set and bedding, so it was more organization and accessories that I was after. 

Whenever I'm looking for something for our house, I head to Home Goods and Hobby Lobby. They both carry a lot of unique and affordable pieces. I found a mason jar candle, a throw pillow, a wreath, and a basket that looks like a suitcase at Home Goods. The "Home Sweet Home" pillow was actually in our study (I love it when I can shop in my house....unfortunately it doesn't happen that often), but it looks great in our guest room so I found different pillows for the study. I guess that kind of defeats the whole purpose of "shopping in my house" because in this case I ended up needing to go out and buy something new for the room I stole it from. :-/


I wasn't originally planning on replacing the headboard (why spend money if you don't have to?), but when I saw this old door at Hobby Lobby I knew that it would make a perfect headboard. All I have to do is move one of the hooks so I can hang it horizontally instead of vertically and hang it on the wall. Right now it's just sitting on the bed. I plan to hang it a little higher so it's more visible, but I think I'll need Michael's help on that.


I found a lot of fun decor pieces at Hobby Lobby. I am not a fan of birds, but when I saw this old birdcage (terrarium?) I decided it would be perfect to add a little color to the room. I picked up some cotton stems for filler. I simply pulled the cotton off of the stems and threw it into the cage. I was able to relocate the lamp on the nightstand from another spot in our house where it wasn't really needed.


I had an old silver mirror in the closet, so I decided to paint it white and hang that above the dresser rather than using the dresser mirror or buying something new. 


I also found these fun framed paper flowers at Target.


I found some fun guest room printables on Today's Creative Life, so I added the "Be Our Guest" and Wifi password to the room as well.


I'm almost finished and am loving the way the room is turning out! I'll post an update once we hang the headboard! Now we just have to clean out the closet....

XOXO,